How to Create an eCommerce Website with Joomla in 6 Steps
Making the move to selling products and services online – often called eCommerce – is a major step forward for your personal business.
Implementing and utilizing an online presence can expand your consumer base far beyond your existing, local audience.
While creating an online store used to be a challenge several years ago, new and improved eCommerce tools and platforms have made this process easier than ever.

Every online store needs a content management system (CMS) in order to simplify the creation and modification of your online shop content (listings, purchase orders, etc). Thanks in part to its free and open-source format, Joomla has become one of the most popular CMS options available to all would-be online store operators.
Creating websites with Joomla is a snap, from start to finish. Even so, first-time eCommerce operators may need a helping hand when it comes to building an online store with Joomla. As such, I’ve created this 6-step tutorial to teach you how to create an eCommerce website with Joomla.
With this eCommerce website tutorial in hand, you’ll be well on your way to building a powerful and versatile online store in no time at all.
eCommerce solutions - custom development
Step #1: Find Optimal Web Hosting
Before you pick out your domain name, you’ll need to find optimal online hosting for your website. There is a wide variety of options in this step, including what hosting provider and service type (dedicated, shared, managed, etc) you select. In fact, many web hosting providers now offer options catered to the needs of online shop operators. These options may be your best bet.
Because you are planning to use Joomla as your CMS, I highly recommend seeking out specialized Joomla hosting. These providers optimize their user-end experience to maximize Joomla’s built-in capabilities, allowing you to get the most out of your online store.
Step #2: Select a Domain Name
When it comes to building an online store, you have to start from the ground up. That often means buying the digital “land” upon which your online store will be built. To do that, you’ll need to purchase a domain name.
Your domain name acts as the sign on the front of your online store. In other words, it should be unique and memorable without being too complicated. For example, Lena’s Tea Shop should opt for a simple domain name like “lenastea.com”, rather than something overly complicated like “lenasteashoponline.com”.
Though tempting, you’ll also want to shy away from unusual top-level domains like “.pizza” or “.flowers”. Statistically speaking, the tried and true “.com” and “.net” remain the easiest for customers to remember when navigating back to your online store.
Step #3: Download and Install Joomla
With your online presence firmly beneath your digital feet, you can take the next step and download Joomla from its official source.
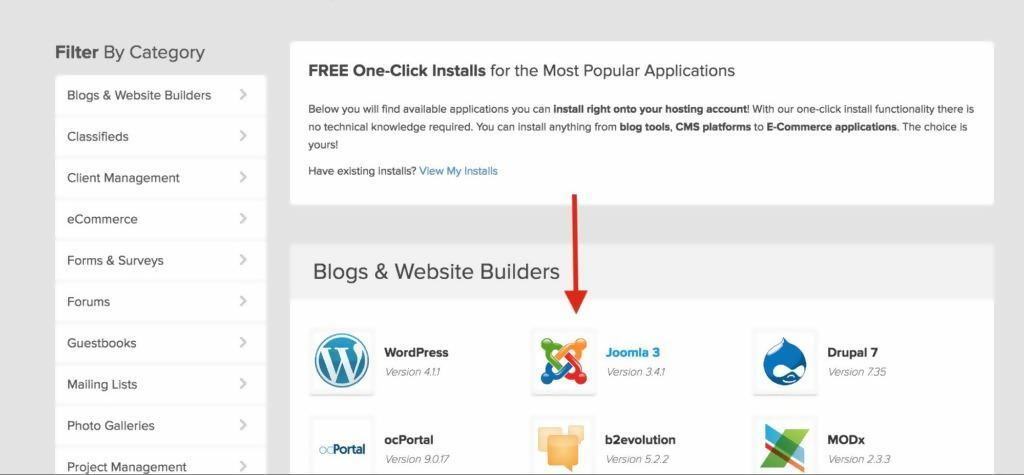
Once downloaded, you’ll have two options for installing Joomla on your website: automatically and manually. Depending on your chosen web hosting provider, you may be able to install Joomla on your new website in one click. In your website control panel, search for one-click installation options and navigate to the colorful Joomla button, if available.
In most cases though, you’ll need to manually install Joomla onto your website. The first step in this process can be completed from your website’s main control panel. From there, create a MySQL database. This is where all of your website’s data will be stored, including the Joomla software.
Once you’ve completed this step, you’ll be able to upload Joomla and implement it onto your website. To implement Joomla, open a new window and navigate to your website’s URL. This should initiate the Joomla installation process, after which you can follow the on-screen instructions in order to successfully complete the install.
Step #4: Install Templates, Plug-Ins, and Add-Ons
At this point, you can begin to customize your new online store, from its appearance and layout to its functionality. A wide variety of Joomla templates are available online, providing you with plenty of formatting options for your store’s layout. However, if you still need extra customization, you can often access such options from your main control panel.
Joomla is built with plug-ins and add-ons in mind. Everything from digital shopping cart management and payment options to billing and membership subscription add-ons is available to enhance your online store over time. Joomla’s creators even host an online directory of user-made Joomla extensions, most of which are available for free.

However, installing a bunch of extensions and figuring the whole eCommerce configuration yourself might be challenging.
There are, however, pre-made eCommerce solutions for Joomla that include everything an online shop could need.
For example, a powerful eCommerce and directory solution: DJ-Catalog2 includes many features needed for a successful eCommerce site: from responsive shopping carts to coupon codes generator, basic stock control, automatic invoices, product comparison, tiered pricing, address book, various payment & delivery methods and much more.
DJ-Catalog2 is a simple to setup Joomla extension that provides a modern & responsive output without need of an advanced configuration.
The Joomla component integrates with the site's template and design. It comes with multilingual and RTL support.
You can add the eCommerce/directory functionality to your existing website or create a new eCommerce/directory web page from scratch.
So, by getting a professional eCommerce solution, you will save a lot of time and headache.
Step #5: Configure your Settings
With your prime functionality and appearance in place, you can begin to configure the many options that make up your customized online store. These options run the gamut for every aspect of your website, including your template, checkout, SEO, and much more. Be prepared to devote some time to carefully reading over and applying these initial settings.
The configuration isn’t just a one-step process either. You’ll need to make configuration changes regularly, especially after you add product listings. The best way to check that your changes are working as intended is through a live test of your website, run on a separate browser in which you are not logged in as the website administrator.
Step #6: Add Product Listings
The step many eagerly await, it’s finally time to post up product listings. At this point, you can use Joomla’s built-in functionality to create and manage your listings without much-added hassle. Joomla handles a great deal of “under-the-hood” information intuitively in this regard, including pricing and availability.
When it comes to visualizing and describing your listings, always use high-quality product images and rich product descriptions. Both qualities have been shown to improve the likelihood of purchasing from “window shoppers.”
Beyond product listings, you can also use this time to flesh out your online store. This should include making a homepage, as well as important pages like an “About Me” and “Contact Us”. Each of these additional pages improves the spirit of your online store and increases the likelihood that a visitor will remember your store later on.
Joomla is A Go-to CMS for eCommerce
At the end of the day, Joomla makes building and implementing an eCommerce platform as easy as can be. Joomla eCommerce is simplified from back to front, from installation to product listing creations.
Online store websites with Joomla are among the most versatile today and you are just a few clicks away from leveraging this versatility for your own business.
Now that you’ve learned how to successfully implement Joomla using this eCommerce website tutorial, you can begin to take the first steps towards making an economic splash online.